There is no single standard license plate frame thickness. One supplier may quote the thickness of the visible rim, another may report overall front-to-back projection, and a third may measure a rear tab or packaging profile. Those numbers cannot be compared until the measurement location and datum are defined.
For sourcing and fit approval, measure the complete installed stack. The dimensions that matter are the ones that affect screw engagement, plate retention, paint clearance, recess fit, camera view, stiffness, and packaging.
Why One Thickness Number Is Misleading
A license plate frame is rarely a flat sheet. It may have a visible rim, recessed plate channel, rear stand-offs, fastener bosses, clips, a printed face, and local ribs. The thickest feature may sit far from the screw location, while the dimension that controls fit may be the projection from the vehicle bracket to the front face.
| Measurement | Definition | Why It Matters |
| Rim or web thickness | Local material section at a defined point | Useful for part design and process control, but not enough to predict installed depth |
| Front-face projection | Distance from the mounting datum to the foremost frame surface | Affects recessed mounting areas, cameras, closures, and visual profile |
| Rear projection | Distance behind the mounting plane from tabs, bosses, clips, or spacers | Affects paint and bracket clearance |
| Plate-channel depth | Space available for the plate inside a holder-style frame | Controls whether the plate sits flat and the clips close |
| Fastener stack thickness | Total thickness under the screw head through frame, plate, washers, and adapters | Determines usable screw engagement and head position |
| Maximum overall part depth | Greatest front-to-back dimension anywhere on the loose part | Useful for packaging and interference screening |
Ask for a section drawing that marks each datum. A product listing that says 3 mm thick, for example, is incomplete unless it identifies what was measured.
Thickness Affects More Than Appearance
Screw Engagement
Adding a thicker frame, washer, or adapter reduces the length of thread that reaches the vehicle mount unless screw length changes. A screw that is too short may not hold securely. A screw that is too long can bottom out or contact components behind the mounting point. Thread type and usable depth are vehicle-specific; thickness alone cannot select the screw.
Paint and Body Clearance
Rear tabs or a bowed frame can sit closer to paint than the nominal face thickness suggests. Measure the minimum clearance after the assembly is tightened, then check each corner for movement.
Cameras, Sensors, Lamps, and Closures
Overall projection and vertical position can matter near a rear camera, plate lamp, tailgate handle, trunk lid, or sensor. A slim visible rim can still have a deep rear bracket or fastener boss.
Plate Visibility
A thick or wide border can cast a shadow or cover information if the clear opening is wrong. Opening size and border width should be controlled independently from overall depth.
Stiffness and Flatness
A thicker section is not automatically a better frame. Material, geometry, ribs, corners, openings, manufacturing process, and residual stress all influence stiffness and warpage. Approve flatness and installed performance directly.
How to Measure License Plate Frame Thickness
Use a calibrated caliper for accessible local features and a height gauge or depth gauge when the datum and projection must be controlled precisely. A straightedge can help identify the foremost or rearmost point, but it is not a substitute for a defined inspection method.
- Define the coordinate system. Mark front, rear, top, bottom, and the mounting datum on the drawing.
- Condition and clean the sample. Remove packaging distortion and dirt without altering the part.
- Measure local sections at named locations. Do not clamp so hard that a plastic or thin metal section compresses or bends.
- Measure overall depth from the datum. Record both maximum front and rear projections.
- Assemble the production stack. Include the actual plate, washers, caps, spacers, adapters, and bracket.
- Check usable screw engagement. Confirm it against the exact mounting point rather than subtracting dimensions from a generic screw length.
- Inspect installed clearance. Tighten according to the approved procedure, then check paint, cameras, lamps, sensors, and closures.
- Repeat across multiple samples. One prototype does not establish production variation.
A Practical Drawing and RFQ Checklist
| RFQ Field | What to Specify |
| Plate format | Actual plate length, height, corner condition, and relevant thickness range |
| Outer envelope | Maximum length, height, and front-to-back depth |
| Clear opening | Minimum visible area plus any no-cover zones |
| Mounting datum | The surface from which front and rear projections are measured |
| Hole or slot geometry | Center locations, slot range, hole size, and head-clearance area |
| Local sections | Named rim, web, boss, tab, and channel measurements |
| Stack components | Plate, bracket, adapter, washers, pads, caps, and hardware |
| Clearance zones | Paint, camera, lamp, handle, sensor, recess, and closure boundaries |
| Inspection method | Tool, datum, sample condition, measurement locations, and rounding rule |
| Tolerance and sampling | Allowed variation and how many pieces are checked per stage or lot |
The license plate frame size guide covers the broader outer size, opening, hole pattern, and regional fit questions. Thickness should be added as a separate drawing layer, not buried in a general dimensions note.
Prototype and Production Approval
Start with a dimensional report for the loose part, then test the assembled sample on the intended bracket or a verified fixture. Record the screw stack, fastener engagement, edge clearance, plate visibility, movement, and any interference. If the program covers multiple vehicles, do not let one installation stand in for the entire fit list.
Production control should focus on the dimensions tied to failure modes. A local cosmetic section may not need the same inspection frequency as a mounting boss or rear tab that determines clearance. Use the drawing to connect each critical dimension with a test method and acceptance rule.
Thickness Questions to Resolve Before You Choose Hardware
- Which surface is the mounting datum?
- How much of the screw length is consumed by the actual stack?
- Does the screw head sit inside a recess or above the plate channel?
- Can a washer or cap close without loading the frame unevenly?
- Is there a hard stop behind the threaded mount?
- Does the installed frame remain flat after tightening?
Use the license plate frame screw size guide to organize the hardware variables. The correct screw depends on the mount, not only the frame.
Frequently Asked Questions
What is the standard thickness of a license plate frame?
There is no universal frame-thickness value that covers every material, profile, holder, and vehicle. Define the feature and datum before comparing specifications.
Is a thicker license plate frame stronger?
Not necessarily. Strength and stiffness depend on material, profile, ribs, corners, openings, process, and load path. Compare an installed sample and relevant tests rather than one local dimension.
Does a thicker frame need longer screws?
It may, because the frame can consume more of the available screw length. Select hardware from the complete stack, thread type, required engagement, and safe depth behind the mount.
Should thickness include the license plate?
Report both part thickness and installed stack thickness. They answer different questions. The stack should include every component under the fastener head.
How should a supplier show frame thickness?
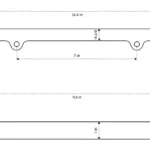
Use a dimensioned cross-section with named datums and measurement locations. Include maximum front and rear projection, local critical sections, and tolerances.