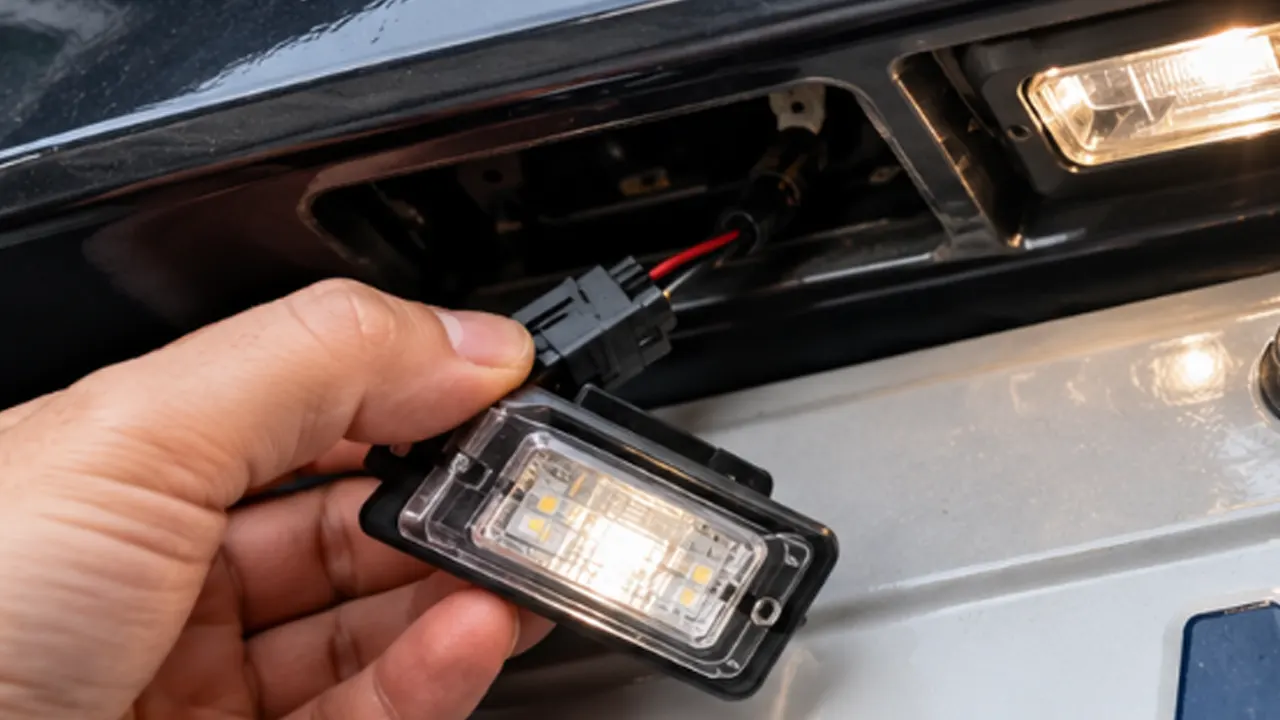
To change a license plate light, first check whether your vehicle uses a replaceable bulb or a sealed LED lamp. Switch the lights and ignition off, let the lamp cool, follow the owner’s manual to reach the socket or assembly, and install the specified replacement. Refit the seal and housing before testing the light. The access method varies: some lamps release from outside, some have a socket behind the bumper, and others require interior trim access or professional service.
The small lamp above the rear plate is easy to overlook until one side goes dark. It can also be easy to damage if you pry at the wrong end or buy a bulb for a different version of the car. A few checks before opening the housing can save a broken clip, water leak, or second parts order.
Confirm That the Plate Lamp Is Actually Out
Park safely and switch on the exterior lights in the mode that normally illuminates the rear plate. Daytime running lights may not switch on the plate lamps, so do not judge the result from the front lights alone. Consult the lighting section of your manual if the automatic setting is unclear.
Look at both lamps if the vehicle has two. Check from directly behind the plate and from each side. Dirt on the lens, a displaced plate, or a wide frame can create a dark area even when the bulb works. Clean the outside of the lens gently and move an obstructing accessory only when it is safe to do so.
Take a photograph before dismantling anything. It records which lamp is dark and how the housings sit in the trim. If both lamps are off, a pair of failed bulbs is possible, but so is a shared electrical fault. Do not assume two new bulbs will solve every case.
If the lamp flickers when the trunk or tailgate moves, note that observation for a technician. It can help distinguish a lamp problem from a connector or wiring issue. Avoid repeatedly opening and closing the panel to make a damaged connection work.
Find the Correct Procedure for Your Exact Vehicle
Use the year, model, body style, trim, and market specification. A sedan and hatchback with the same model name may have different rear trim and lamps. A facelift or optional lighting package may also change the part you need.
Look in the owner’s manual for “license plate lamp,” “number plate light,” “exterior bulbs,” or “bulb replacement.” Check both the removal diagram and the bulb specification. A general video may show the right car name but the wrong generation or lamp type.
Official manuals demonstrate why access cannot be generalized. One Ford procedure reaches the bulb socket from behind the rear bumper and twists the socket out. A current Hyundai manual treats certain LED plate lamps as technician-service items. Neither instruction means you should pry every lens out from the front.
If the manual gives no owner replacement procedure for an LED lamp, do not split the housing to search for a bulb. Ask the vehicle maker, dealer, or a qualified repairer which assembly is serviceable and how it is replaced.
| Lamp arrangement | What may be replaced | What you need to establish |
|---|---|---|
| Bulb in a removable socket | The specified bulb | Socket release, bulb base, rating, and sealing arrangement |
| Lens retained by screws or a spring clip | Bulb, lens, or lamp as specified | Correct release point and which parts are intended to separate |
| Integrated LED lamp | A service assembly, depending on the vehicle | Exact assembly, connector, mounting, and repair instructions |
| Lamp behind trunk or tailgate trim | Bulb or assembly | Trim removal procedure and clip positions |
| Damaged socket or wiring | More than a bulb | Electrical diagnosis and a repair appropriate to the vehicle |
Choose the Replacement Before Taking the Lamp Apart
Match the part to the manual or a reliable vehicle-specific parts lookup. Bulb base shape, electrical rating, physical size, and lamp design matter. Two bulbs that look similar can have different contacts or sit differently inside the lens.
Do not assume a common small automotive bulb fits every plate lamp. Likewise, a replacement listed for a model range may exclude an LED-equipped trim. If the car has been modified, compare the installed assembly with the original specification before ordering.
For a sealed LED assembly, check the complete part identification, connector shape, side designation if applicable, gasket, and retaining clips. A housing that fits the opening can still have a different electrical connection or light distribution.
Keep the new part in its packaging until you have compared it with the old one. If the replacement needs force to fit, has a different locking tab, or does not sit flush, stop and recheck the application. Trimming a tab or adapting a connector can turn a simple service task into an unreliable modification.
A bulb replacement is a good opportunity to restore the specified lighting. Changing color, brightness, electronics, and mounting at the same time makes it harder to identify why a problem appears afterward.
Gather the Tools and Prepare the Work Area
Use the tools required by the vehicle’s procedure. These may include a correctly sized screwdriver, a suitable trim tool, a small light, clean gloves, and a container for screws. You may need replacement clips or a gasket if the service information specifies them or the old parts are damaged.
Work where you can see small tabs and retrieve a dropped screw. If the lamp is in an open trunk lid or tailgate, make sure the panel is safely supported in its normal open position. Do not rely on a weak lift support while leaning beneath it.
Switch off the ignition and lighting before working and allow hot parts to cool. Follow any model-specific electrical isolation instruction. Disconnecting a battery is not a universal first step: it can have vehicle-specific procedures and effects. For an electric or hybrid vehicle, stay with the documented low-voltage lamp service and leave unfamiliar electrical systems alone.
If you need to reach beneath a bumper, do so only from a safe position. Do not crawl under a vehicle supported only by a jack. When access requires lifting or removal of substantial trim, having a workshop complete the job may be the practical choice.
Removing a Lamp That Releases From the Outside
Some housings have screws; others use a spring tab or sliding retention feature. Read the diagram before inserting a tool. The correct release point may be at one end, while the other end has a fixed locating hook.
If the manual specifies screws, use the correct bit and keep it fully seated. Support the small lens or housing so it does not drop when the final screw releases. If a screw is seized or its head is stripping, stop before damaging the surrounding trim.
For a clip-retained housing, apply pressure only at the indicated release feature using the specified tool. Do not pry around the entire perimeter to discover which side opens. That can crack the lens or deform a gasket surface even if the lamp eventually comes out.
Ease the assembly out just far enough to see the connection. Photograph the connector and socket orientation. Avoid letting the housing hang by its wires. A short harness may have very little slack, and pulling it can damage a terminal or nearby connection.
If an external lens does not appear to be a service cover, do not assume it should separate. Some lamp assemblies are sealed, and trying to remove the clear section can destroy the part.
Removing a Socket Behind the Bumper or Trim
A rear-access design may allow you to remove the socket while leaving the lens in place. Find the socket using the manual’s illustration rather than twisting the first connector you can reach. Nearby components can include a camera, trunk release, parking sensor, or other lamp.
Hold the socket body and turn it only as the procedure directs. Some use a partial rotation; others have different retention. Do not twist the wiring to rotate the socket. Once released, withdraw it carefully so the bulb does not hit the edge of the opening.
If interior trim blocks access, remove only the panels identified in the service procedure. Trim clips can have concealed centers or a specific release direction. Pulling a whole panel from one corner may break clips or bend it.
Keep each fastener with the location it came from. Similar-looking screws can have different lengths. A simple photo sequence is useful when the reverse side of the panel is difficult to see.
Do not continue if access turns out to require an unfamiliar handle assembly, camera adjustment, or electrical component removal. The appearance of a lamp on the outside does not tell you how complex the back of the trim is.
Replace the Bulb or Serviceable Assembly
Once the socket is out and cool, remove the bulb in the way its base requires. Some pull straight out; others use a twist or another retention method. Grip the appropriate part gently and avoid crushing glass or deforming contacts.
Compare the old and new parts before fitting the replacement. Check the base, length, contact arrangement, and specification. Follow the bulb manufacturer’s handling instructions. Clean handling is sensible, but do not transfer instructions for a high-temperature headlamp bulb indiscriminately to every plate bulb.
Seat the new bulb fully without forcing it. A bulb that sits at an angle can make poor contact or touch the housing. If the socket is loose, cracked, melted, or badly corroded, replacing only the bulb leaves the underlying fault unresolved.
For a serviceable LED assembly, release the connector lock as instructed and hold the connector body rather than the wires. Check for trapped dirt, damaged terminals, or moisture. Fit the specified assembly and confirm the connector locks normally.
Do not open a sealed LED module, splice a different connector, or add resistors simply because a seller describes the replacement as an upgrade. Use the documented repair or have an automotive electrician assess compatibility.
Inspect the Seal Before Reassembly
The lamp’s sealing and retention parts deserve attention. A gasket out of its groove, a trapped wire, or a cracked lens can allow water into the lamp or surrounding trim. A new bulb does not correct those problems.
Check that the gasket is present, clean, and positioned as designed. Remove loose debris without gouging the mating surfaces. Replace a damaged seal with the correct part if available. Do not add household sealant as a substitute for an unknown gasket arrangement.
Inspect the lens for cracks and the clip for distortion. A broken clip may let the lamp move even if it looks flush initially. Where the housing is damaged, a correct replacement assembly is usually more appropriate than tightening harder or wedging it in place.
Route wiring along its original path and make sure it will not be pinched by trim or a fastener. Leave connectors and drainage arrangements as designed. Refit the socket and housing without twisting or overloading the wiring.
Refit the Housing and Test the Light
Reverse the vehicle’s removal procedure. Align locating hooks, tabs, and gaskets before securing the lamp. Start screws by hand and tighten only as specified. Small plastic housings can crack if you try to make a misaligned part sit flush with screw pressure.
Once everything is secure and tools are clear, switch on the exterior lights. Check each plate lamp and look for flickering. If the car reports an exterior-lamp fault, note whether it clears according to the manual rather than repeatedly cycling the system.
View the plate in reduced light. The number and required identifying areas should be illuminated without a frame or accessory blocking the light path. A bright spot on the bumper does not necessarily mean the plate itself is well lit.
Close the trunk or tailgate normally and check that nothing moves, rattles, or pinches. Recheck the lamp after the next ordinary use and look for moisture if the area is exposed to rain. If the housing remains loose or water enters, correct the fit or seal rather than accepting it as normal.
If the replaced side looks noticeably different from the other lamp, compare the specified parts and inspect both lenses. A dirty or aged lens can change the apparent brightness, while a mismatched bulb can create a different pattern. Do not compensate by fitting a brighter bulb at random. Restore the appropriate part and lens condition, then reassess the plate with both lamps operating.
Check the License Plate Frame While You Have Access
A thick top border, projecting decoration, or incorrectly positioned plate frame can sit between the lamp and the plate. You may notice a shadow across the upper characters or a registration mark even though the lamp works.
If the vehicle’s procedure requires removing the frame for access, support the plate and keep track of the hardware order. Reinstall it with the right screw engagement and without forcing the plate against a curved surface. The instructions for installing a license plate frame explain the plate-side checks separately from lamp repair.
A narrow frame can leave more space around the plate, but the name “slimline” does not prove lighting clearance. Compare the actual opening, top edge, lamp position, and plate recess. Slimline license plate frames are one styling option when the chosen model suits that geometry.
A decorative LED frame is also different from the original plate lamp. Installing one does not automatically replace a failed factory lamp or establish compliance with lighting rules. Restore the vehicle’s specified lamp first and assess any accessory separately.
If the New License Plate Bulb Still Does Not Work
Switch the lights off before checking your work. Confirm the bulb or assembly is the correct part and fully seated, and that any connector lock has engaged. Inspect for a displaced contact, damaged socket, broken clip, or moisture that was overlooked.
If the vehicle uses a replaceable fuse, identify it from the correct manual and follow the stated inspection and replacement procedure. Use only the specified rating. Do not bridge a fuse or install a larger one to keep the circuit alive. If a new fuse fails, stop and have the circuit diagnosed.
When both plate lamps are out, a shared supply, ground, control, or wiring issue may be involved. A scan-capable diagnostic process may be appropriate on some vehicles. Avoid replacing several parts in succession without understanding whether power reaches the lamp.
An aftermarket LED bulb that flickers, triggers a warning, or does not operate may be electrically incompatible, incorrectly installed, or defective. Do not assume every symptom needs an added resistor. Return to the specified equipment or have compatibility checked.
If the light responds to movement of the trunk harness or repeatedly fails after replacement, describe that pattern to a technician. Intermittent wiring faults are different from a normally worn bulb and deserve a proper repair.
Choosing Between a Bulb Change and a Workshop Visit
Owner replacement is reasonable when the manual provides a clear procedure, access is straightforward, the socket is sound, and you have the correct replacement. Work slowly and keep the lamp’s small clips and seals intact.
Use a workshop if the lamp is a sealed unit without an owner service procedure, the connector or socket is heat-damaged, wiring is corroded, or interior trim removal is beyond your experience. A cracked lens or repeated water intrusion also needs more than another bulb.
There is no reliable universal time or cost for the job. A reachable socket and a lamp integrated into a complex trim panel are different repairs. Ask whether a quote includes the bulb or assembly, seals, damaged clips, diagnosis, and labor so you can compare the same work.
Keep the old part identification and the replacement receipt. They make future service easier and can help resolve a wrong-part issue. If both lamps use the same bulb and one has failed, inspect the other; replacing them together is a convenience decision, not a requirement for every vehicle.
A Final Check Before Driving at Night
Check that the original plate lamps work in the correct exterior-light mode, that the housings sit securely, and that no wiring is exposed or trapped. Make sure the plate is clean enough to inspect and that the frame leaves its information and illumination unobstructed.
Look at the assembly with the trunk or tailgate closed. An open panel can change the apparent light pattern and make a poorly seated housing harder to notice. The installed, closed position is the meaningful check.
If any lamp warning, flicker, loose housing, or obvious dark area remains, resolve it before treating the replacement as finished. A successful repair restores the intended lamp function and keeps the surrounding parts properly assembled.
Frequently Asked Questions
Do I have to remove the license plate to change its light?
Sometimes, but not always. Many lamps are reached from above or behind the plate area. Remove the plate or frame only if the vehicle’s access procedure calls for it or it obstructs the specified access.
Can I replace an LED license plate light bulb?
Some lamps use replaceable LED retrofit bulbs, while factory integrated LED units may have no separate serviceable bulb. Check the original lamp design and manual before buying a replacement or opening the housing.
Why does the new bulb work only intermittently?
A poor contact, damaged socket, loose connector, wiring fault, or incompatible replacement may be involved. Switch the system off and inspect the documented connections. Persistent flickering needs diagnosis rather than repeated bulb changes.
Will changing the bulb fix a cloudy or cracked lens?
No. A damaged lens can affect light distribution or sealing even with a working bulb. Check whether the lens is a separately serviceable part or whether the complete lamp must be replaced.
Should I disconnect the battery first?
Follow the exact vehicle procedure. Battery disconnection is not required as a blanket step for every lamp and can involve separate instructions. Always switch the ignition and lights off before the service and let hot components cool.
Can a license plate frame block the light?
Yes, depending on its top border, decoration, mounting position, and the lamp geometry. Check the actual illumination with the frame installed. A frame’s nominal size alone does not establish clearance.